Procedure to configure Mirkotik Hotspot for AiWiFi
This document will give a details information that how to create Mikrotik hotspot for AiWiFi Captive login. To configure you need following tools and hardware,
- Winbox
- Mikrotik WiFi router
- login.html file
Let’s configuration Hotspot, to do follow below steps,
- Login to Mikrotik using latest Winbox from
- Got IP>Hotspot and follow the steps as describe
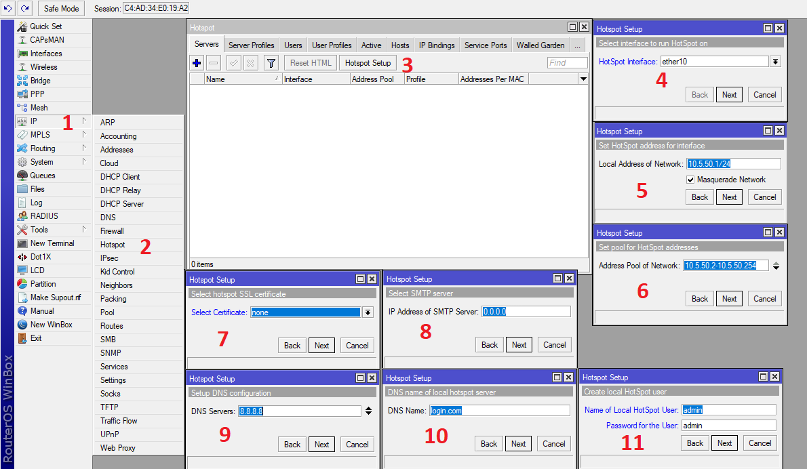
- Click on Hotspot Setup (3),
- Select the interface where Hotspot will run (4). This can be Bridge/wLan. Press Next,
- Choose a network for your hotspot users (5). Press Next,
- Define IP range for the user (6). Press Next,
- If you don’t want use SSL certificate, select none (7). Press Next,
- Now select SMTP server if you have (8). Press Next,
- Select DNS server (9). Press Next,
- Define a domain name, preferable which mention in certificate (10). Press Next,
- Finally, it will ask and user and password. Fill and press Next (11).
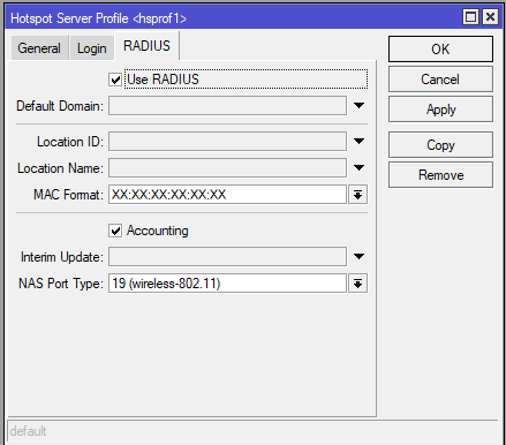
3. Your Hotspot profile are created. Now you have to select the login options. Go to IP>Hotspot, then go to Server Profiles Tab. Follow below steps
- Here you will find recently create hotspot profile, double click on it. A new box will appear.
- Go the Login tab and check only HTTP PAP and then Press Ok.
- Then go the Radius tab and check Use Radius, Accounting. Select NAS Port type as 19(wireless-802.11) and then Press Ok.
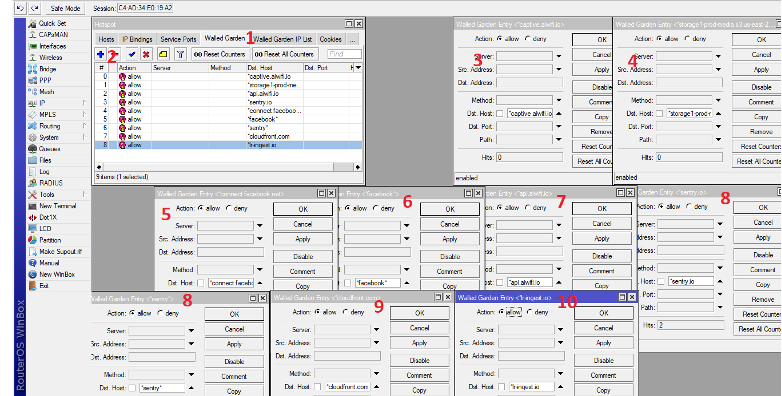
- You Radius profile is done. Next part is to configure walled garden for following host,
- captive.aiwifi.io
- storage1-prod-media.s3.us-east-2.amazonaws.com
- api.aiwifi.io
- sentry.io
- connect.facebook.net
- facebook.com
- sentry.io
- cloudfront.com
- lr-ingest.io
- doubleclick.net
- To do this go to IP>Hotspot. The go to Tab named Walled Garden (1) and click Add button (2). After then put the host name in Host field as showing in below image for all host listed above.
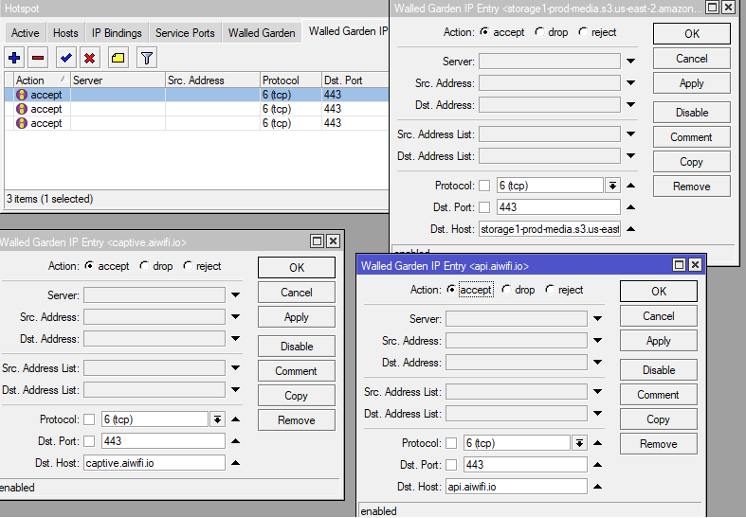
- After complete all 9 host in Walled Garden you have add captive.aiwifi.io, api.aiwifi.io and storage1-prod-media.s3.us-east-2.amazonaws.com in Walled Garden IP also for HTTPS. To configure this,
- Go to IP>Hotspot.
- Then click on Walled Garden IP List. Then click on Add button.
- Now put Dst. Host, Dst. Port and Protocol for all three hosts as shown in below image.
- The final step is to replace the login.html file in the Mikrotik file directory with our login file. To do follow bellow steps
- Go to Files. Here you will find a directory named hotspot. Search a file named login.html under hotspot directory. Should be shown as hotspot/login.html
- Now select the file “login.html” from the directory and remove by pressing (-) button.
- Now drag and drop “login.html” file which we provide in the same directory. Please make sure that the file position is same as like previous.
- After previous step you are done with all the hotspot configuration. Now you have to configure Radius client in Mikrotik router. Follow below steps,
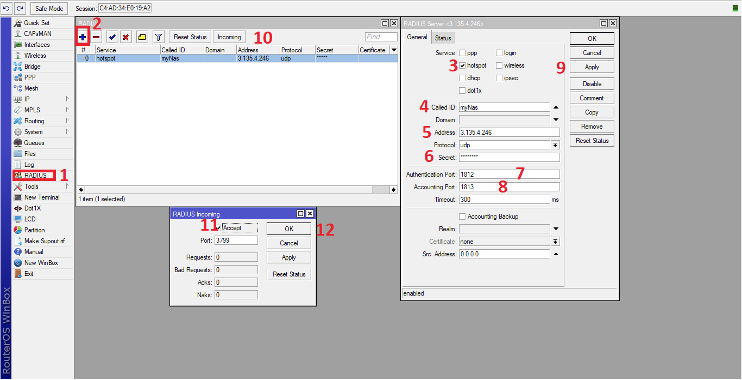
- Go to Radius (1) and click on Add (2).
- Check hotspot (3)
- Set Caller ID as “myNas” (4) optional.
- Set Address as “3.135.4.246” (5).
- Set Secret as “mysecret” (6).
- Authentication port 1812 (7) and Accounting Port 1813 (8)
- Now press Apply (9)
- If you want to allow incoming connection click on Incoming and press Accept.
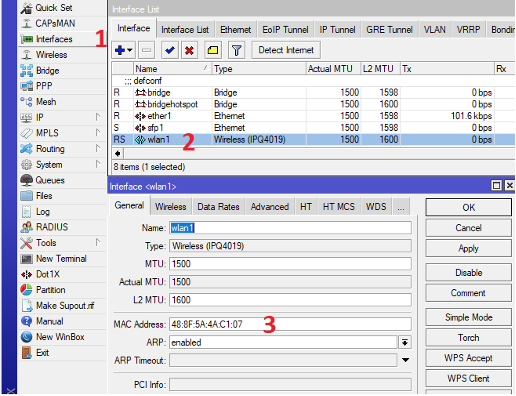
- Now only one step is pending, that is identifier of AP/router which will be used to validate AP in AiWiFi. Please follow below steps,
- Go to Interface (1). Double click on the WLAN interface (2). You will see a mac address (3), copy it.
- Go to System>Identifier (1,2). Paste the mac address you copied in step-a (3). Finally press ok (4).
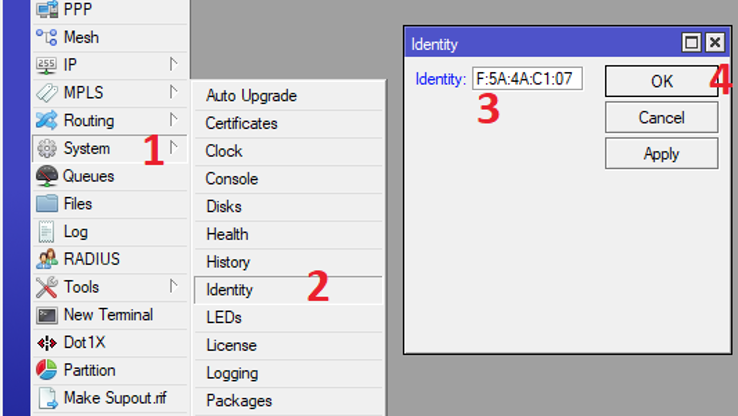
If you done all the steps properly, configuration is completed. Now connect the WiFi you should redirect to a login page and user will authenticate from AiWiFi.
You should copy the same MAC address of previous step to add the access point to your Aiwifi Dashboard.